If you want to set up a Google Domain to Namecheap Hosting, you’ve come to the right place! In this article, I’ll show you how to get your domain set up and work with the Namecheap hosting server in just a few steps.
Requirements need to point Google Domain to Namecheap Server.
- You purchased a domain from Google Domain
- You have a Namecheap shared hosting plan (I’ll use Stellar Plus)
- Familiar with the cPanel dashboard
Step 1 – Log in to your Google Domain Account and update the DNS settings in the Custom name servers section.
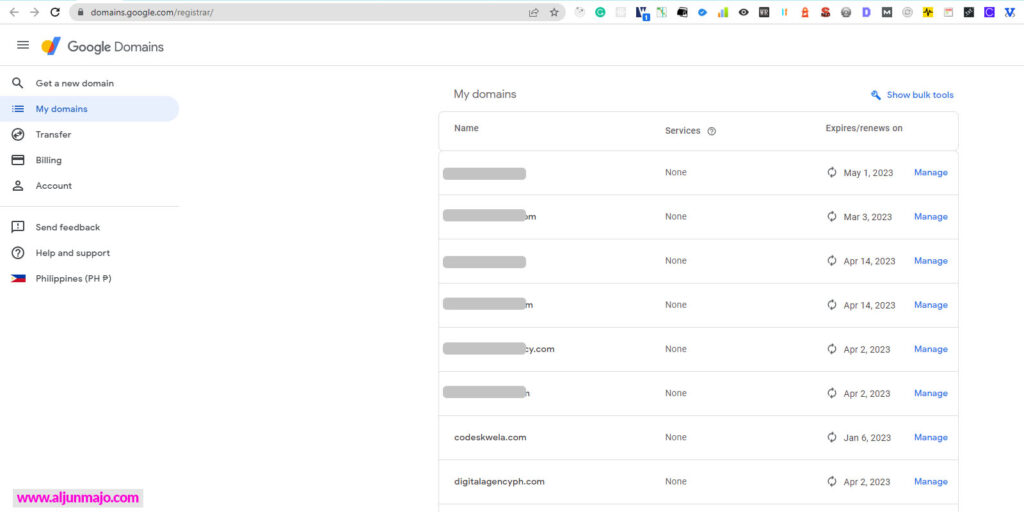
I assume that you already have a Google account and purchased a Google Domain. In this tutorial, I will use the domain name digitalagencyph.com. The image below it shows the main dashboard of Google Domains.

You will see the manage button in line with the domain name in the domain list section. My example in the image below shows digitalagencyph.com and the “Manage” button link (see Fig. 1.2). Click the “Manage” button to navigate to the “Domain Overview” page(see Fig. 1.3).
In the left area, click the “DNS” button link and navigate to the Name Servers section.
To configure the Google Domains Nameservers to Namecheap, you have two options configuring the Google nameservers. The options are configuring using the Google Domain “Default name servers” or the “Custom name servers.”
In this tutorial, I will use the “Custom name servers” Google domain configuration. Select or click the “Custom name servers” tab.
Now in the “Custom name servers” section, you will see the two form fields. For these fields, you need to add the Namecheap nameservers.
In this setup, I use the Namecheap Shared Hosting Stellar Plan.
Step 2 – Find the Namecheap nameservers
From Namecheap documentation, I found that if you have a Stellar, Stellar Plus, or Stellar Business plan with Namecheap, you need to point the domain to Namecheap Web Hosting DNS nameservers (dns1.namecheaphosting.com and dns2.namecheaphosting.com).
These two Namecheap nameservers are what we need to add on Google Domain DNS Custom name servers settings.
Step 3 – Add Two Namecheap Nameservers on Google Domain DNS
In the Google Domain DNS section, add the two Namecheap nameservers in the Custom name servers.
Make sure you click the “Save” button to update the new Namecheap nameservers.
After you save the new Google DNS settings, activate the new settings that are added to Google DNS. To activate the settings, click the “Switch to these settings,” and the “Custom name servers” tab will show the text “(Active)”
Before Google DNS switched to “Custom name servers.”
After Google DNS switched to “Custom name servers.”
Step 4 – Add the domain name from google to Namecheap Hosting Server
Now login/sign in to your Namecheap account. (In the top right-hand corner of the page, there is an option to Sign In.)
After the successful login/signin, your main Namecheap dashboard will show as shown in the image below.
In the All Products section, find and select “Go to Cpanel” in your hosting plan account.
After clicking “Go to cPanel,” you will be redirected to the cPanel main dashboard.
Scroll down and find the DOMAINS section.
In the DOMAINS section, select “Addon Domains.”
After clicking “Addon Domains” you will be redirected to that section.
In this Addon Domains section, you will see the form fields. In the form field name “New Domain Name,” enter the domain name from your Google domain list. In my Google domain, I use this digitalagencyph.com.
After you enter the domain name(in my example digitalagencyph.com), the other fields “Subdomain” and “Document Root” will be entered automatically.
After filling in all the necessary fields for the “Create an Addon Domain,” click the “Add Domain” button.
After successfully adding the domain, you will be redirected to the successful page.
Now click the “File Manager” to see the root directory of the newly added domain.
Below is the root directory of the newly added domain.
You have successfully set up your Google domain to Namecheap Shared Hosting Server.
Final Thoughts: Google Domain to setup on Namecheap Shared Hosting
Setting up the Google domain to NameCheap shared hosting server is easy if you know the cPanel and Google DNS(Nameservers configuration). If you want to have quick and hassle-free you can hire a freelance web developer from Fiverr or Upwork.